
Pick the right WiFi card for PC
Choosing a PCIe WiFi card for PC means matching the hardware to your router’s capabilities and your case’s physical constraints. The market splits into three distinct tiers: Wi-Fi 6, Wi-Fi 6E, and Wi-Fi 7. If your router is older, a high-end card won’t speed up your connection. Conversely, buying a budget card for a Wi-Fi 7 router leaves performance on the table.
Start by checking your motherboard or router specs. Wi-Fi 6 (802.11ax) is the current standard for most homes, offering speeds up to 2.4 Gbps. Wi-Fi 6E adds the 6 GHz band, which reduces congestion but requires a compatible router. Wi-Fi 7 (802.11be) is the newest generation, promising multi-gigabit speeds and lower latency, but it requires expensive new hardware to realize those benefits.
The physical form factor is equally critical. Most desktop WiFi cards use the low-profile PCIe x1 slot, fitting into slim cases and pre-built towers. Full-height cards require a standard desktop chassis. Ensure the card includes external antenna connectors if your case lacks internal mounting points. Without proper antennas, even the best chip will suffer from poor signal strength.
Compare the key specifications below to see which generation fits your setup. Note that Bluetooth versions usually pair with the WiFi standard, so newer WiFi cards include Bluetooth 5.3 or 5.4.
| Generation | Max Speed | Bluetooth | Antenna Type |
|---|---|---|---|
| Wi-Fi 6 | 2.4 Gbps | 5.0+ | 2x2 MIMO |
| Wi-Fi 6E | 2.4 Gbps | 5.0+ | 2x2 or 4x4 MIMO |
| Wi-Fi 7 | 4.8+ Gbps | 5.4 | 4x4 MIMO |


As an Amazon Associate, we may earn from qualifying purchases.
Prepare your desktop for installation
Before you open your computer case, set up a workspace that minimizes the risk of damaging sensitive electronics. Static electricity is the silent killer of PC components; a tiny discharge you can’t feel can fry the circuitry on your new WiFi card or Bluetooth adapter.
Start by unplugging your PC from the wall outlet and holding the power button for five seconds to drain residual charge. Place the tower on a hard, flat surface like a table—carpeted floors are a major source of static buildup. If you have an anti-static wrist strap, clip it to the bare metal chassis of your PC. If not, frequently touch an unpainted metal part of the case to ground yourself before handling any components.
Gather your tools within arm’s reach so you aren’t rushing or cluttering your workspace. You will need a Phillips-head screwdriver that fits your case screws snugly, and your new WiFi card or Bluetooth adapter. Clear away any loose items that could fall into the case once the side panel is off.
-
Unplug the PC and drain residual power
-
Work on a hard, non-carpeted surface
-
Use an anti-static wrist strap or touch the chassis frequently
-
Have a Phillips-head screwdriver ready
-
Keep the new WiFi card or adapter nearby
Take a moment to ensure your lighting is good. You’ll be working with small connectors and antennas, so visibility matters as much as safety.
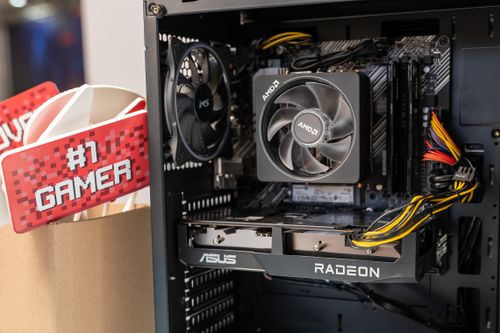
Install the WiFi card in the PCIe slot
a WiFi Card for PC and Bluetooth Adapter for PC works best as a sequence, not a scramble through settings. Do the minimum first: confirm compatibility, connect the core hardware, update only when needed, and test the result before adding optional features. That order keeps the task understandable and makes failures easier to isolate. After each step, pause long enough for the interface to finish syncing. Many setup problems are timing problems disguised as configuration problems. If the same step fails twice, record the exact error, restart the smallest affected piece, and retry before moving deeper.

Attach the external antennas
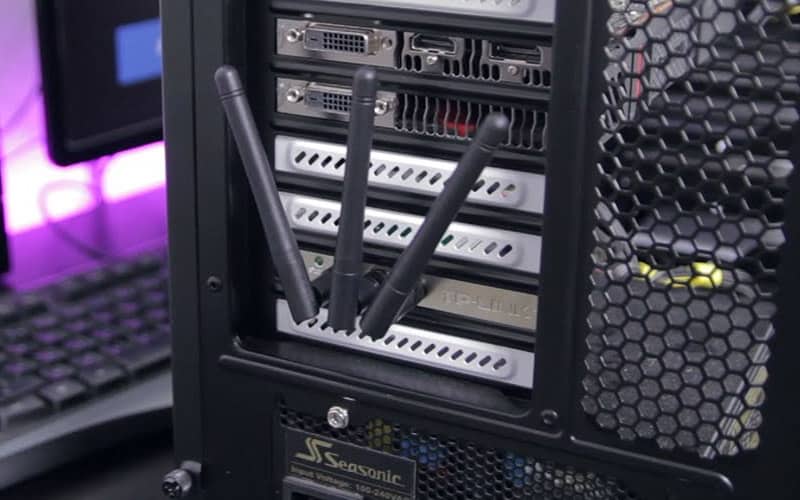
Most people skip this step, and it’s the most common reason a WiFi card for PC underperforms. The internal traces on the card are fine for basic connectivity, but external antennas are required to capture signals from your router, especially through walls or across a room. Without them, your device is broadcasting into a vacuum.
Locate the two small, gold-colored connectors on the back of your installed WiFi card. They are usually labeled with numbers like 1 and 2, or colors like black and white. Align the antenna base with the corresponding connector. Push it straight down firmly until it seats, then twist it clockwise by hand. Tighten it until it feels snug—do not use tools, as the plastic threads can strip easily.
Once attached, position the antennas so they point in different directions. If your router is on the floor, angle one antenna vertically and the other horizontally. This cross-polarization helps the card catch signals regardless of how your router’s antennas are oriented, maximizing your WiFi card for PC performance.
Push the antenna base straight down onto the gold connector until it sits flush. Ensure the pins align with the hole in the connector.
Rotate the antenna clockwise by hand. Stop when it feels tight. Avoid using pliers, which can crack the connector housing.
Angle one antenna up and the other out. This orientation helps the WiFi card for PC receive signals from multiple planes, reducing dead zones.
Connect the USB header for Bluetooth
Most PCIe WiFi cards handle wireless internet through the slot, but Bluetooth requires a separate connection. The card includes a small USB cable that plugs into a header on your motherboard. Without this cable, your PC will have WiFi but no Bluetooth.
This step is easy to miss, but it is required for Bluetooth functionality. The cable is usually black and has a 9-pin connector on one end. The other end connects to the WiFi card itself.
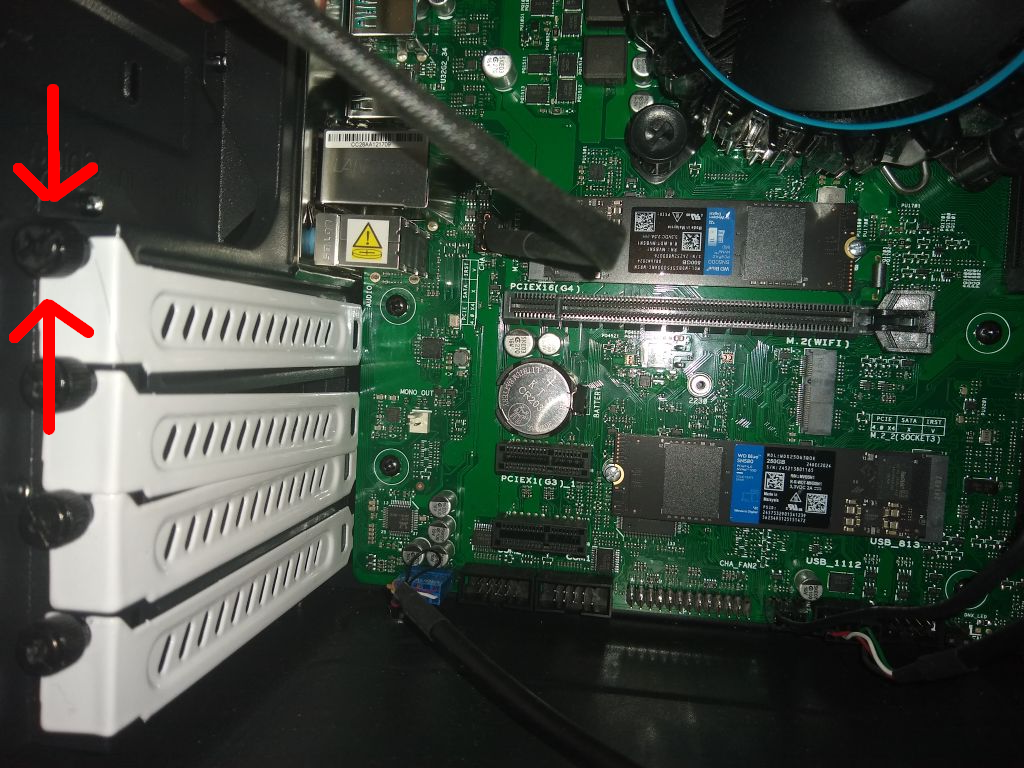
Look at the bottom edge of your motherboard. You will see a small, vertical block of pins. It is usually labeled USB9_10, USB11_12, or JUSB. It has nine pins arranged in two rows.
Find the small USB cable attached to your WiFi card. It is usually short and black. Plug the 9-pin end into the header on the motherboard. Ensure the pins align correctly; the connector is keyed to prevent incorrect insertion.
Gently press the connector until it sits flush. Do not force it. Once connected, you can proceed to install the WiFi antennas and close your PC case.
If you skip this step, Windows will install the WiFi drivers, but Bluetooth will not appear in your settings. Check your device manager after booting to confirm the Bluetooth adapter is recognized.
Install drivers and test the connection
a WiFi Card for PC and Bluetooth Adapter for PC works best as a sequence, not a scramble through settings. Do the minimum first: confirm compatibility, connect the core hardware, update only when needed, and test the result before adding optional features. That order keeps the task understandable and makes failures easier to isolate. After each step, pause long enough for the interface to finish syncing. Many setup problems are timing problems disguised as configuration problems. If the same step fails twice, record the exact error, restart the smallest affected piece, and retry before moving deeper.
Common installation mistakes to avoid
Even with the right tools, a WiFi Card for PC can fail to initialize if you overlook a few mechanical details. Most connectivity issues stem from physical connection errors rather than driver conflicts. Check these four points before closing up your case.
Loose or inverted antennas
WiFi performance relies entirely on the antenna connection. The U.FL or IPEX connectors on the back of the card are tiny and fragile. If you force them or leave them unattached, you might still get a signal, but your range will drop to just a few feet. Ensure the connectors click firmly into place on the card before routing the cables through the case.
Wrong PCIe slot
Not all slots are created equal. While a WiFi card will physically fit in any PCIe x1 slot, installing it in a slot that shares bandwidth with your primary GPU or SATA ports can cause instability. Always plug the card into the topmost x1 slot or one clearly labeled as PCIe x1. Avoid slots directly adjacent to the graphics card to prevent physical interference and thermal throttling.
Missing internal USB header
Many modern WiFi cards include Bluetooth functionality that requires a USB 2.0 connection. The card has a small internal cable that must plug into a free USB header pin on your motherboard. If this cable is left dangling, your WiFi will work, but Bluetooth will never appear in your device manager. Trace the cable carefully to ensure it is seated.
Driver confusion
Installing the hardware is only half the battle. Windows may install a generic driver that lacks the full feature set. Always download the latest drivers from the manufacturer’s support page or the motherboard manual’s download section. Do not rely on Windows Update to provide the specific firmware for your new WiFi Card for PC.
Check that both antenna cables are firmly seated on the card’s IPEX ports. Look for the small color-coded rings (usually black and white) to ensure they match the card’s labeling.
Locate the internal USB header on your motherboard. Plug the small USB cable from the WiFi card into the correct pins. This step is critical for enabling Bluetooth functionality.
Insert the card into the topmost PCIe x1 slot. Press down evenly until the retention clip clicks into place. Secure the bracket screw to the case to prevent the card from falling out.
No comments yet. Be the first to share your thoughts!